17 August 2012

The Other Side

The Other Side of the Postage Stamp Quilt A-long

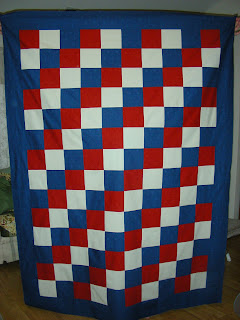
As soon as I finished the front side of the Red White and Bold PSQAL, I was determined that I was done, I was not going to do anything for the reverse side of it except a solid piece of fabric. Yeah! Right! I woke up the next morning with ideas for the back.

So, I went through the fabrics that I had from the Red White and Bold line, and decided to do 5.5" blocks of solid red, solid white, and solid blue squares, with a blue border. I went into one of my cross stitch software programs, and designed up the quilt. Then on Tuesday I cut out the squares, and got them into piles by rows.

The squares are all cut...

I've got a pattern to go by...

The rows are all ready for sewing...
 
Wednesday morning I went into the craft room, determined to finish up the back, and this is the final result: 


Thursday morning I took both tops to the quilter, along with some of the red fabric for the binding. Funny thing is, what I thought was going to be the front is now going to be the back... Why? you ask... Since this quilt is going to a 14 year old boy, we asked a gentleman, who was waiting for his wife browsing at the quilt shop, to help us decide which would be the top or the back. This was his choice, and my hubby's choice the night before!

Pat, who owns Quilter's Cottage in Surfside, does my quilting for me. I've asked her to do big stars and little stars, using a red, white, and blue overdyed quilting thread. We had to make a decision on the front of the quilt so that she would know which side to do the quilting on. The stars will also show up better on the bolder side.

I can't wait to get it back to see what magic she has worked on it!!

The Other Side of the world, where the Needles N Crafts online group is based, has produced another exchange, this time a pincushion exchange. Vivian was in charge of this exchange, giving us our partners. I had Vivian, and Nik had me!

Now, what is more American than pie??!!?? So, I crafted a blueberry pie for Vivian. Her daughter must've been hungry:
  
Isn't she a sweetie?!?!?!

I added a few other items in...

 Today I received my pincushion from Nik:

It looks like a big flower!

Nik also sent a pearl brooch and a bag kit...

Included in the package was a pearl brooch (I wonder if those are real Sabah pearls and diamonds... lol) and a kit to make a felt bag. Good thing the instructions have pictures, because the directions are in Malay! I'd better get out my Malay to English dictionary, or type the Malay into Google Translator!!

So, now I'm off to stitch on the Blackbird Designs Stitch-along that MW and I are doing, and I have two Christmas ornaments do stitch up also...

Thanks for dropping by!

09 August 2012

Red White and Bold Postage Stamp Quilt

Finally!  1200 blocks later, each one a 2.5" square... the top is done!!  At first, hubby and I had some serious doubts about how this would turn out...  After all, I was using the most wild and funky print that I could find... Okay, maybe not THE most funky print that's out there, but this print is OUT THERE, if you know what I mean, lol.  Kind of reminiscent of a dress that I wore in the late 60s/early 70s (Hey! I was just entering my teens then, and everybody was into the flower power thing, lol)

a sampling of funky prints

I'm pretty sure I had a dress like the print on the left!

I started the evening with a pile of blocks:


These were all 25 Patch blocks, 48 of them...  About 7 hours later, this is the end result:


So what's next??  Well, if you'd asked me last night, I would've said just a solid piece of solid colored fabric for the back.  Of course, I woke up this morning thinking about something different for the back, like another quilt top!!  Perhaps solid red, white and blue 5.5" blocks...  After all, it would only take 192 of them...

You know what!?!?  I think I'm going to head off to Melanie's for a Stitch & Bitch session... I have some needlework to catch up on!

Thanks for dropping by!

03 June 2012

Postage Stamp Quilt Progress - June

Whew! Have I been busy, busy, busy!!  Jelly roll strips have been paired up, sewn together, and now I've got a LOT of cutting to do.  Well, to be truthful, I'm just one quilt behind... Let the pictures show you what I'm talking about...


This is what 240 strips look like - that's six jelly rolls, two per quilt.  Some of them are already paired and sewn, but not yet ironed open, and some are ironed.


After sewing up pairs of strips, then I had to sew two of those pairs together, plus a third strip of either a solid or a print.  This is from the 'Red, White & Bold' collection by Sandy Gervais, Moda Fabrics.

Here's a few pictures of some strip sets sewn together:


Two nights ago I'd hoped to finish sewing up the strip sets for the 'Dogwood Trail' quilt, but as I was getting the first two together, the sky was darkening.


Since I was sitting in the corner by two windows, I decided to turn off the sewing machine and start cutting rows out of 'Red, White & Bold'.


Last night I finished sewing up the strip sets for 'Dogwood Trail', and got them all ironed out, ready for cutting.  This fabric is also from Moda, from Sentimental Studios.  The colors are not really to my own liking, but I fell in love with the fabric design anyway.  Don't know why....


Matching up strip sets for 'Dogwood Trail'


Two quilts ready for cutting...

And finally, today I matched up the third quilt, 'A Morris Garden' (Barbara Brackman, Moda), into strip sets...


Now I'm off to go sew these up.  Then it's LOTS and LOTS of cutting.  Each strip set yields 17 rows, 16 strip sets per quilt, 3 quilts... 816 rows...  Here I come!!!

See you on the other side of all those rows!  Thanks for dropping by...


09 May 2012

Postage Stamp Quilt Along

The NNC group is doing a postage stamp quilt along!!  Everybody has been busy cutting up squares of fabric, strips of fabric, or just taking the easy way out and buying two jelly rolls like me!!

Well... I'm not one to totally do things the easy way...  No, I'm making THREE postage stamp quilts!!  And yes, I'm using the jelly rolls for all three, whew!  Here's a photo of the jelly rolls for one of the quilts:


The jelly roll on the left is from the Red White and Bold Moda fabrics, about 4 or 5 years ago.  The roll on the right is Natural Bella Solids.
Here's another view of this funky fabric, just one of many crazy prints in the line:


This quilt is destined for a teenaged boy... Hopefully it will be funky enough for him...

I was wondering how I was going to keep three quilts separated so that I wouldn't sew the wrong strips together.  One day I was looking at the quilt rack in our bedroom, and guess what!  It works perfectly for... you got it!  My quilt strips!  See...


MW has given us a month to get all of our strips sewn together, and then to start cutting new strips...  Stay posted to the progress...

Thanks for dropping by!
Diane

27 March 2012

Friendship Bag Exchange

Yep! Another exchange with the NNC group!!  This time it was a Friendship Bag exchange.

Mel and I were partners for this exchange, sending to each other.  When I saw the mail lady pull up at the end of the driveway, instead of right up to the mailbox, I knew that the package was from Mel.

Here are photos of what Mel sent to me:


See the bird on the bag??  This year MW added a 'challenge project', a bird, for the Anniversary Meet.  I have a feeling there are going to be a lot of birds going back and forth between members.  This one is the first!


The bag is reversible!!  Even the handles!!!  She is so clever!!


And look at all that was in the bag!!  Buttons, ribbon, brads, fabric, tiny clothespins, thing-a-majigs (how do I explain this one?!?  you use the thing-a-majig to pull string tighter, like what you might have on the string of a hat, to keep it from blowing away), and a small cross stitch key chain kit.  The white and black tin, to the left of the bag, has 2 smaller tins inside of it; they'll be great for tea, buttons, endless possibilities...

Mel, thank you so, so much for all the goodies!!!!

One of the requirements was that you had to make the bag (the other requirement was that you had to fill it!).  Now, this was totally new to me.  I fretted over what I was going to do, searched online for various patterns and tutorials, and finally settled on a version of a bag that Martha Stewart made (check out this tutorial:  http://www.marthastewart.com/254095/heart-felt-bag-1).  Instead of felt, though, I used fabric.  But I used her idea of an interfacing between the two fabrics...  However, my bag was definitely going to be without handles... sorry Mel!

One of my favorite colors is yellow, so I decided to theme everything I was sending to Mel around yellow.  It's like sending a bag of sunshine, no??  I went through all my yellow fabrics, and came up with something bright yellow with flowers.

Here are photos of the bag and goodies that I sent to Mel:


Even without handles it's not THAT bad looking...


And some sunshine goodies!

I do so enjoy these exchanges with the Needles 'n Crafts group!!  Check back in a couple of weeks for my posting on the Anniversary Meet; I'll be posting about what I made for the exchange gift, as well as that &@#* bird that MW chose as our challenge project.

Thanks for dropping by!!

January and February are done!!

Where has the time gone??  The first quarter of 2012 is almost past!  Whew! the time does fly!  And I haven't even started March yet!!

Huh!? What??  Do I have you confused yet??

Actually, I've been stitching on the Little House Needleworks monthly series that came out in 2010.  So far I've got January and February stitched up.  But I haven't even started on March! and my plans were to have each month stitched up before that month was done!

Here are pictures of January:


and February:


Sorry!  I'm NOT telling what I'm going to do with them, not just yet....

Okay, I'm off to go start on March....  Thanks for dropping by!

17 March 2012

Needlework Retreat

Last weekend I attended a needlework retreat, Still Stitching with Susan, here in Myrtle Beach.  Susan is none other than Susan Greening Davis.  I've taken classes with her before, several years ago, when The 3 Needlewomen were teaching, and she was one of them.  But that's ancient history!
The teaching project for this retreat, worked up rather quickly, once the outside edge was finally stitched.  As you can see, I've still got to do some cutting and weaving, inside of my klostered/satin stitched areas.

We were given some wool felt and a button-print fabric to make a small bag with, and the small sampler will be attached to the wool felt.  For the larger stitched project, we were given another bag, already made.


I like the bag just as it is!  It is great for holding the fabric and threads for the project sampler.

No retreat would be complete without the chance to buy more stash, right?!!??  Well, I won't disappoint, lol.  Here are some pictures of just a few things that I purchased...

I bought 2 different bags, both gorgeous, and hand made!

I just love fat quarters!!!


It's hard to resist beaded scissor fobs!  And the scissors case is so easy to make!!


I was told to just cut a heart template, cut 2 pieces of fabric, put some batting between them, fold the heart in two and stitch up the sides and edges.  How easy is that??  Your fabric could be pieced, crazy quilted with stitches and lace, or any other way that you want it embellished...

I enjoyed myself at the retreat, and look forward to next year's chance to sit and stitch with friends.

Lots of other projects are in the making...

Thanks for coming by!
Diane